Clipping path King
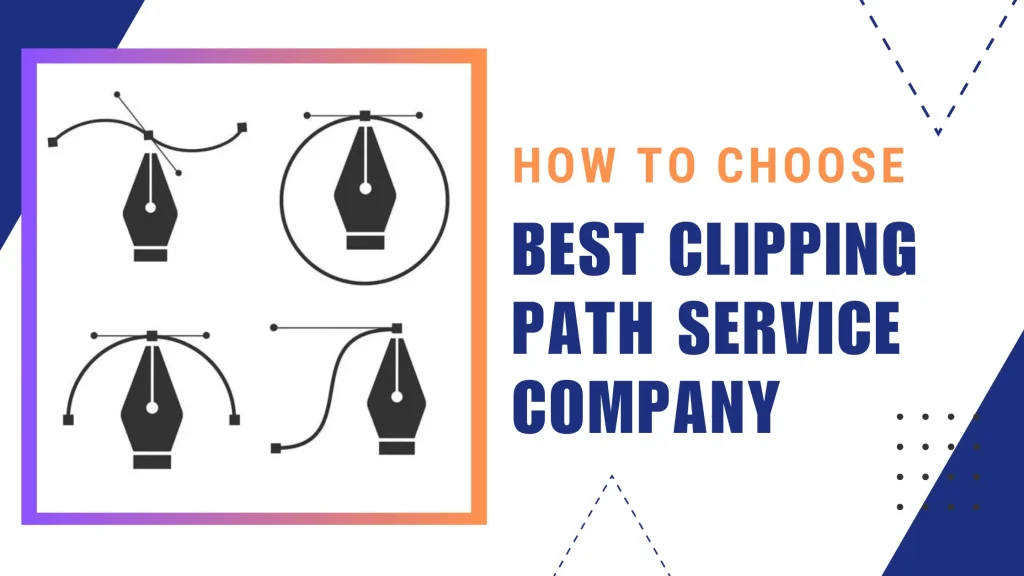
How to Choose the Best clipping path service provider Company
What do you first notice when shopping for a new toy or shoes online? The answer is the image. The pictures, right? Those pictures are super important because they help you decide what to buy! Online stores use this trick to make their product pictures look awesome.
Clipping path like a magic wand that carefully traces around an object in a picture. It separates the object from everything else. This makes the product the star of the show! It’s like shining a spotlight so you can see all its amazing details.
What is clipping path?
A clipping path is a Photoshop technique. It uses the pen tool to outline an object in an image. This outline acts as a mask, separating the object from its background. Once you create the clipping path, you can remove the background. You can replace it with a solid-color or transparent background. Then, you can apply effects to the isolated object.
What is deep-etch?
A clipping path is an image editing technique. It isolates an object from its background in a digital image. It is also called deep-etch. In this process, you create a closed vector path around an object. This lets you manipulate it separately from the rest of the image. A clipping path is key for product photography editing. It lets you create clean, professional images that show your products in the best light.
How Does Clipping Path Work?
A clipping path in Photoshop draws a line around an object. For example, let’s talk about a red apple on a table. First, the tool outlines the apple. Then, it removes the background. Finally, you can place the apple on any new background. This can be a blue sky, a green field, or even in outer space.
Here’s how it works, step-by-step:
- The Pen Tool:
Photo editing software, like Photoshop, has a special tool called the Pen Tool. It is used to draw the line around the apple. It’s like a super precise digital pen!
- Anchor Points:
When using the Pen Tool to outline an apple, you add “anchor points” along its edges. These points act like pins in sewing. They help define the shape of the apple.
- Connect the Dots:
The computer connects your dots with lines. It outlines the apple. It’s like a coloring book but turns dots into a path.
- Cut and Paste:
Once the path is complete, the computer uses it like a cookie cutter. It uses the path to separate the apple from the background. Now you have a picture of just the apple, without the table or anything else.
Clipping paths enhance pictures. They work for simple shapes, like circles and squares, or complex ones, like a bicycle or hair. The complexity of the shape affects the time and skill needed. Sometimes, computer programs can try to create paths automatically, but they often fail.
Why is Clipping Path Important?
Clipping paths act like magic scissors. They cut out your image from the background clutter. Then, your friends can admire it without distractions. But clipping paths do more than just make things look neat. They are super important for:
- Making Products Look Super Cool:
Pictures of toys or clothes in magazines or online often have a clean, white background. This is because clipping paths have been used to remove any messy backgrounds. This makes the products look cool and pro.
- Focusing on What’s Important:
Clipping paths highlight the main picture part. For example, when you view a new bike photo, the path removes the background. This action lets you focus on the bike, specifically its details. You can easily see the handlebars and wheels.
- Changing the Background:
At times, you might want to place a picture on a different background. For example, you may wish to position a friend in front of a castle or on the moon. Clipping paths enable this by allowing you to cut out objects and relocate them.
- Making Pictures consistent:
Imagine you’re online, looking at pictures of various shoes. You wish they all looked the same for easy comparisons. Clipping paths remove backgrounds, placing each shoe on a consistent white background.
- Saving Time and Money:
Taking new pictures can be hard or expensive. However, clipping paths offer a cost-effective solution. They allow changing a picture’s background. This saves time and money. It’s ideal for businesses and anyone looking to enhance their images.
So, clipping paths are more than just a fancy trick. They’re a powerful tool that can help make your pictures look amazing, focus on the important things, and even save you time and money!
Type Of Clipping Path
Defending on The image quality and complexity clipping path come in different types, depending on how tricky the object you want to cut out is.
Basic Clipping Paths
This level is perfect for beginners. It’s as easy as cutting a simple shape with scissors, such as a circle or a square. You can use it for objects with smooth, straight lines, like a ball, a box, or the basic outline of a car. No fancy moves are needed here!
Medium Clipping Paths
This level is more challenging. It’s for objects with a few more curves or details, like a chair with curved legs or a lamp with a fancy shade. It’s the medium clipping paths
Complex Clipping Paths
Now, we’re getting into the expert levels! Complex clipping paths are for objects with lots of details, curves, or holes. Cutting a fluffy dog’s curly fur or a flower with many petals is hard. It requires focus and skill to do it well.
Super Complex Clipping Paths
This challenge is the toughest! It’s about intricate and detailed objects, like shiny jewelry with small gems or hair in the wind. Only true experts can master it.
So, clipping paths come with different types of difficulty. But no matter what level you’re on, the goal is the same: to carefully cut out an object from its background so it looks amazing!
Clipping Path Tools To use
Creating a clipping path is like cutting out a picture with scissors, but you do it on the computer! And just like you have different kinds of scissors for different jobs, there are different tools you can use in photo editing software like Photoshop:
Pen Tool: Digital Pen
| Pros | Cons |
| Super Precise: Like drawing with a ruler, it creates perfect lines and curves. | Takes Time & Practice: It’s like learning a new skill, but it needs patience. |
| Great for Complex Shapes: Can handle even the trickiest objects like hair or fur. | Not as Quick: Not the fastest tool for simple shapes. |
This is the most popular tool for creating clipping paths. It’s like a magic pen that lets you draw a perfect line around an object, even if it has lots of curves and details. Think of it as the tool artists use to draw the outlines of their pictures.
Magic Wand Tool:
| Pros | Cons |
| Super Fast: Click once, and it selects colors like magic! | Not Always Accurate: Sometimes it selects more than you want. |
| Easy to Use: Even little kids can learn to use it! | Not Good for Complex Shapes: Gets confused by lots of colors and details. |
This tool is like a color-detecting magnet! It can quickly select areas of your picture that are the same or similar in color. This is helpful for selecting simple objects like a ball or a book.
Lasso Tools:
| Pros | Cons |
| Freehand Drawing: Draw around the object like with a pencil. | Less Precise: Lines might be wiggly, not perfect for detailed work. |
| Magnetic Lasso Sticks: (special version) Helps you trace edges. | Still Needs Some Skill: Takes practice to get smooth lines. |
Imagine drawing a line around an object with your finger on a touchscreen. That’s what the Lasso Tool is like! It lets you draw freehand around the object you want to cut out. There’s also a Magnetic Lasso Tool that’s like a magnet – it sticks to the edges of the object as you draw, making it easier to create a precise outline.
Color Range Selection:
| Pros | Cons |
| Perfect for Single Colors: Grabs all the areas that match one color easily. | Not Good for Mixed Colors: Struggles if colors are similar. |
| Can Be Quick: If your object is a solid color, this tool is super fast! | Needs Fine-tuning: Might need to adjust settings to get it right. |
This tool is like having a special set of crayons that only color in specific shades. You can use it to select all the parts of your picture that are a certain color, like all the red parts of an apple.
Vector Path Software: Adobe Illustrator
| Pros | Cons |
| Super Smooth Lines: Creates the most perfect lines, like a pro artist. | Not for Beginners: Takes more practice to learn and use. |
| Great for Logos & Graphics: Perfect for designs that need to look sharp. | Different Software: Usually not in basic photo editors. |
This is a more advanced tool that professional designers and artists use. It’s like having a super-powered version of the Pen Tool that creates extra smooth and perfect lines.
Remember, each tool has its own special abilities! Some are better for simple shapes, while others are great for tricky objects with lots of details. It’s like choosing the right tool for the job, just like you would in your art class!
Step-by-step process of clipping path in Photoshop
Clipping paths are the key to clean product images. They also unleash your creativity in photo editing. Here is a detailed breakdown of the process in Photoshop. It includes handy shortcut keys to make your work smoother.
1. Prepare Your Canvas (Ctrl+O or Cmd+O):
- Open Sesame: Begin your creative journey by launching Photoshop and opening the image you want to transform.
- Duplicate for Safety: Before making any changes, create a duplicate layer of your original image (Ctrl/Cmd + J). This safety net ensures you can always revert to the original if needed.
- Zoom In for Precision: Magnify your view (Ctrl/Cmd + “+” or use the Zoom Tool) to get a closer look at the edges of the object you want to isolate. This will help you create a more accurate clipping path.
2. Wield the Pen Tool (P):
- Your Precision Instrument: The Pen Tool is your key for accurate clipping paths. It’s like a digital scalpel, enabling precise cuts in images.
- Mastering the Pen: Learn the Pen Tool’s many functions. Click to create anchor points, click and drag to create curved segments, and hold Shift for perfectly straight lines. Take some time to practice drawing paths on simple shapes before tackling more complex objects.
3. Craft the Clipping Path:
- Anchor Point Placement: Start by clicking on the edge of your subject to create anchor points. These points are the foundation of your path. Aim to place anchor points at key points where the object’s shape changes direction – corners, curves, and areas of fine detail.
- Shape Your Curves: After placing anchor points, click and drag to create curved segments. The direction and length of your drag determine the curve’s shape. Experiment with different handle lengths and angles to achieve the desired curvature.
- Refine Your Path: Use the Pen Tool’s Direct Selection Tool (A) to fine-tune your path. Click and drag individual anchor points or handles to adjust their position and shape. The goal is to create a path that perfectly hugs the contours of your subject.
- Close the Loop: Once you’ve traced the entire object, click back on the first anchor point to close the path. A small circle will appear next to the Pen Tool cursor, indicating a closed path.
4. Make the Selection (Ctrl+Enter or Cmd+Enter):
This handy shortcut will instantly turn your path into a selection, highlighting the area inside the path.
5. Refine Your Selection:
Expand: If your object has soft edges or a slight blur, use the “Select > Modify > Expand” command to expand the selection by 1-2 pixels. This helps to create a cleaner, more defined edge.
Contract:
If your selection includes too much background, shrink it with “Select > Modify > Contract.”
Feather:
To soften an edge, use the feathering effect. First, select the object. Then, choose Modify and Feather. This will create a gradual blend with the background.
Refine Edge: The Refine Edge tool is perfect for objects with complex edges, like hair. It helps you adjust the selection edge. You can adjust settings for a natural look. Do this by changing the radius, smoothness, and contrast.
6. Inverse the Selection (Shift+Ctrl+I or Shift+Cmd+I):
Press this shortcut to invert the selection. Now, the area outside your object is selected. This is the part we want to remove.
7. Remove the Background (Delete):
With the background selected, simply press the Delete key on your keyboard. The background will disappear, leaving your object on a transparent layer.
Save with a Transparent Background:
To save an image with a transparent background, use Shift+Ctrl+S or Shift+Cmd+S. First, click “File” and then “Save As.” Select PNG. This format supports transparency. This means you can easily place your image on any background.
Create a clipping path automatically.
Making a clipping path in Photoshop can save you time and effort. This is especially true when working with simple or clearly defined objects. Here are a few methods you can use:
1. Subject Select Tool:
- Recent Photoshop versions added this AI-powered tool. It finds and selects the main subject in your image.
- click the Subject Select button in the Options bar or go to Select > Subject.
- If the initial selection isn’t perfect, you can refine it using the Quick Selection. You can also use the Lasso tools.
- Once you are satisfied with the selection, right-click it. Then, choose “Make Work Path” to convert it into a clipping path.
2. Object Selection Tool:
- Like Subject Select, this tool finds and selects objects in an image. It does so automatically.
- Choose the Object Selection Tool from the toolbar. Drag a rectangle around the object you want to isolate.
- Photoshop will make a selection around the object. You can then refine it if needed.
- Right-click on the selection. Choose “Make Work Path” to make your clipping path.
3. Quick Selection Tool (W):
- This tool is excellent for quickly selecting areas with similar colors or textures.
- Click and drag the Quick Selection Tool around the object you want to isolate.
- Photoshop will automatically expand the selection based on color and contrast.
- Refine the selection edges using the “Select and Mask” workspace. This is available in newer Photoshop versions or the Refine Edge tool.
- Right-click on the selection and choose “Make Work Path.” This will convert it into a clipping path.
Important Considerations:
- Automatic clipping path tools are convenient. But, they may not always be 100% accurate. This is especially true for complex images or fine details.
- You might still need to make manual adjustments with the Pen Tool.
- Manual clipping path services are often recommended for the highest-quality results for professional product photos or images with intricate details.
Clipping Path Options
Imagine you’re erasing part of a drawing you made on your tablet. You want the edges to be really neat and tidy. In Photoshop, special settings called clipping path options help you do just that! They’re like having different kinds of erasers and rulers to help you make your picture look perfect.
Threshold:
If the threshold is high, the eraser only erases where there’s a big difference. This happens, for example, between a black cat and a white wall. But if the threshold is low, the eraser works even where colors are only slightly different. For example, it can work between a brown dog and a beige carpet.
Tolerance:
Tolerance is like deciding how close you want to erase to the edge of your drawing. If the tolerance is high, you erase a little further away from the edge, making the erased line smoother. But if the tolerance is low, you erase very close to the edge, removing every tiny bit of the drawing.
Insert Frame:
This option is like putting a special frame around your drawing after you’ve erased part of it. It’s like adding a colorful border to your artwork! You can choose how thick you want the border to be.
Why are these options important?
They help you:
- Make the edges of your cutouts look neat and tidy.
- Keep all the important details of the object you’re keeping.
- Create awesome pictures with different backgrounds or cool effects!
AI vs Manual Clipping Path
Manual Clipping Path
You create manual clipping paths using the pen tool in Photoshop. It takes skill and precision to make accurate paths around complex objects.
| Pros | Cons |
| Precision: It’s the best way to cut out an object accurately. | Time-Consuming: It takes time and patience For proper cutout. |
| Perfect for Tricky Details: No matter how small or complicated, it can handle hair, fur, or anything see-through! | Requires Skill: you get better with practice; it requires enough skill. |
| Complete Control: You decide exactly where to cut, like following the lines in a coloring book. | Not the Fastest: It takes a lot of time because the work process is manual. |
AI Clipping Path
AI clipping paths are made using machine learning. They can automatically detect and isolate objects in an image.
| Pros | Cons |
| Blazing Fast: it can cut out your image through lots of pictures in no time! | Not Always Perfect: Sometimes, it cuts corners, especially with tricky shapes or blurry edges. |
| Super Easy: Even a beginner can use it, due to the simple process. | Need Fixing: You might need to use the Pen Tool to fix any mistakes. |
| Saves Time: Great if you have many pictures and need them done quickly. | Limited Control: You can’t always tell it exactly what you want. It has a mind of its own! |
Photoshop Pen Tool for Drawing Curves and Straight Lines
In Photoshop, the pen tool draws straight and curved lines. It’s also key for clipping paths. To draw a curve, click and drag to set the anchor points, which shape the curve.
Pen Tool in Inkscape
Inkscape’s pen tool is also similar to Photoshop. It draws vector paths around objects. Inkscape is free and open-source, making it a great Adobe Illustrator alternative for creating and editing vector graphics.
How to Draw a Curved Line
To draw a curved line using the pen tool in Photoshop or Inkscape:
- Click to create an anchor point
- Click and drag to create a curved line segment
- Release the mouse button to set the anchor point
- Repeat steps 1-3 to create additional curved line segments
Bezier curves
The curved line segments created using the pen tool are based on Bezier curves, defined by anchor points and direction handles. The direction handles control the shape and direction of the curve.
Advantages of Clipping Path
- Picture-Perfect Cutouts: Clipping paths are like magic erasers, perfectly removing objects, even tricky ones, with lots of details!
- Easy to Move and Change: Once you’ve cut out an object, it’s like a sticker you can put anywhere! You can move it to a different background or make it bigger or smaller. You can also change its colors or add cool effects!
- Picture Match-Up: Suppose you’re making a scrapbook with pictures of all your friends. You want them all to have the same background. Clipping paths can make this happen! You can cut out each friend and put them all on the same background so your scrapbook looks awesome.
- Save Time and Money: Sometimes, taking a new picture can be tricky, especially if you need a specific background. But with clipping paths, you can use a picture you already have and just change the background!
Disadvantages of Clipping Path
- It Takes Time and Practice: Clipping paths is like learning to ride a bike. It takes time and practice to master, but once you do, it’s really fun.
- Needs a Steady Hand: Some objects, like the leaves on a tree, have lots of little details. Making a perfect clipping path around these tricky details can be difficult. But don’t worry—you can always practice and get better!
Who Needs Clipping Path Service?
Clipping paths are like having a magic eraser and super scissors for pictures, and lots of people use them to make their pictures look amazing! Here are a few examples:
- E-commerce businesses:
You’re shopping for any product online. The pictures of the toys usually have a plain white background, right? That’s because online stores use clipping paths to make their products look super cool and professional!
- Photographers and Artists:
These creative folks use clipping paths to make their pictures even more special. They might want to remove something distracting from the background or combine pictures to create a fantasy scene.
- Advertising agencies:
Ads in magazines or online must grab attention. Clipping paths make images stand out and look more appealing.
- Real Estate Agents:
Have you ever seen pictures of houses for sale? The pictures often look extra nice. Real estate agents use clipping paths. They use them to remove messy backgrounds and make houses look their best.
- Fashion Designers:
Fashion designers want their clothes to look amazing in pictures. Clipping paths help them remove the background from photos of models wearing their clothes. This way, you can focus on the fashion!
- Magazines and Newspapers:
Clipping paths are used to tidy up and fit images perfectly on a page. It’s similar to organizing crayons neatly in a box.
- Web designers:
Website designers use clipping paths. They use them to make cool graphics. Clipping paths make websites look more interesting.
- Photo Experts:
Some people are good at fixing and improving photos. They use clipping paths to remove objects and make colors brighter.
How to Choose the Best Clipping Path Service?
Are you finding the best clipping path service? Maintain given thing to get the best clipping path service provider. Here are some things:
Quality of Work
You want someone who is really good at using their the clipping path tools. Check their pictures for smooth edges and full details. This is like ensuring your scissors can cut a perfect shape.
Fastest Service:
Sometimes, you need your pictures fixed up quickly, like if you’re making a birthday card for your mom. Look for a clipping path service that can finish your pictures fast but not so fast that they make mistakes!
Price: How Much Does it Cost?
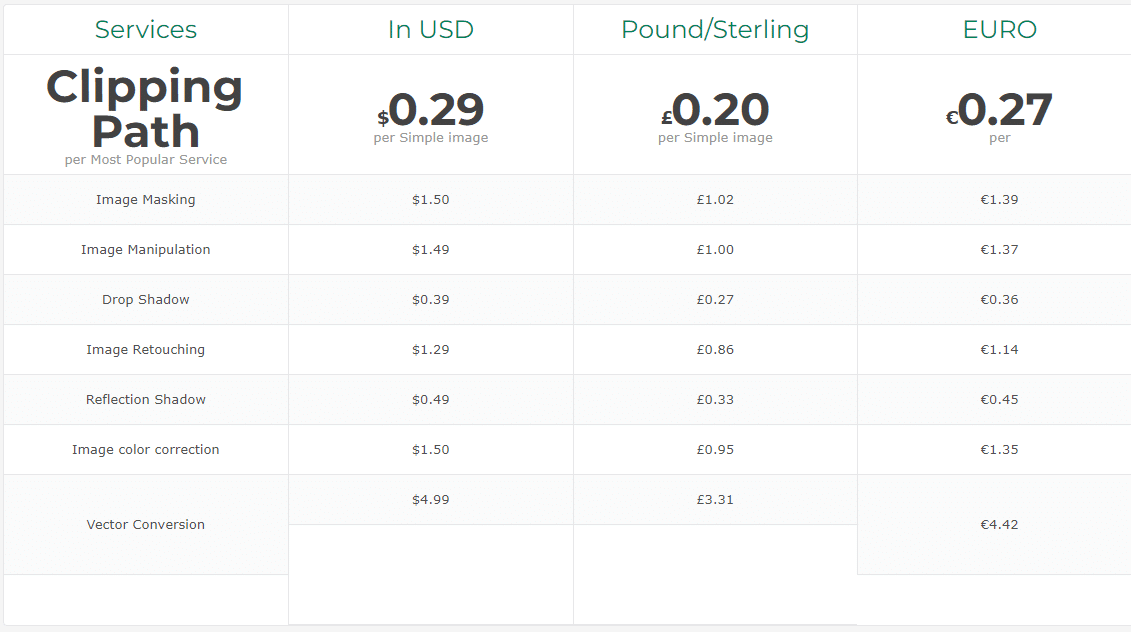
Clipping path services have varying fees. You need a service that is both good and cheap.
Communication: Can You Talk to Them?
Choose a clipping path service. They should be easy to talk to and ask questions. You might have special requests, like a specific background for your picture. It’s crucial to find a service that listens. The service must also be friendly.
Considering these factors will help you find the best clipping path service. This choice will enhance your pictures.
The Benefits of Using Online Clipping Path Service
Using an online clipping path service offers many benefits. These include:
- Access to skilled professionals with expertise in image editing
- Ability to scale up or down based on your needs
- Reduced overhead costs compared to in-house image editing
- It will be faster. And, the workflow will be more efficient.
Clipping Path King: The Best Clipping Path Service Provider
Have you ever seen the sharp product photos on Amazon? Or envied the flawless magazine ads? In them, models and products seem to float effortlessly. Those stunning visuals have a secret. It’s the clipping path. It’s a digital technique that removes backgrounds and isolates subjects exactly. At Clipping Path King, we specialize in this art. We transform your normal images into great assets.
Clipping Path King:
At Clipping Path King, we offer many services. They are tailored to your unique needs:
- E-commerce Product Perfection:
We transform your product photos. We make them eye-catching masterpieces. This makes them look pro. It also makes them hard to resist for online shoppers.
- Photo Editing & Retouching:
Our skilled editors remove blemishes. They improve colors. They create a flawless finish for your portraits, photoshoots, and projects.
- Background Removal & Replacement:
We carefully isolate subjects from their backgrounds. We place them on pure white, solid colors, or custom backdrops of your choice.
- Image Masking & Manipulation:
We create complex masks for detailed subjects. These include hair and fur. They allow for precise edits and stunning composites.
- Raster to Vector Conversion:
We convert your images into scalable vector graphics. These are ideal for logos, illustrations, and design.
Why Choose Clipping Path King?
- Expert Craftsmanship: Our team of experienced editors is dedicated. They aim to deliver the highest quality results.
- Fast Turnaround Time: We understand the importance of deadlines. We work fast to deliver your edited images on time.
- Affordable Pricing: Our services are affordably priced. They suit any budget.
- Customer Satisfaction: We aim to exceed your expectations. Additionally, we offer a 100% satisfaction guarantee.
Open Your Image’s Potential with Clipping Path King!
Ready to enhance your visuals? check Clipping Path King for a royal touch on your images.. Our expert team is eager to help you achieve your vision. They will unlock the full potential of your photos.
Conclusion:
Clipping path makes products look shiny and new in online stores. They help artists create amazing pictures. They are also for having fun changing photo backgrounds. Clipping paths are super useful! They’re like learning a new skill. But, with a little practice, you can become a clipping path pro. Then, you can create picture magic yourself! If you need help with your pictures, remember there are experts. Companies like Clipping Path King can make your photos look great.
FAQ:
What is a clipping path?
A clipping path is a shape that marks a region in an image. It shows only what’s inside this shape.
What are clipping path services?
They’re image editing services. They cut out objects precisely from digital images.
Clipping path vs. background removal?
A clipping path surrounds an object with a shape. Background removal, on the other hand, deletes the background. Often, a clipping path is the first step in background removal.
Why is clipping path important?
It easily isolates objects. This saves time and money, making products look consistent.
Clipping path vs. image masking?
A clipping path is for objects with clear edges. Image masking is for complex edges like hair. It blends objects into a new background.
Clipping path in graphic design?
It isolates elements for editing. This is common in product photography and advertising.
What is the clipping mask’s purpose?
It controls a layer’s visibility to the shape of another layer. This lets you edit specific areas without affecting the whole image.
What are the advantages of a clipping mask over a layer mask?
It applies the effect to many layers at once. This helps with complex designs, saves time, and simplifies editing.
<p>The post How to Choose the Best clipping path service provider Company first appeared on Clipping path King.</p>